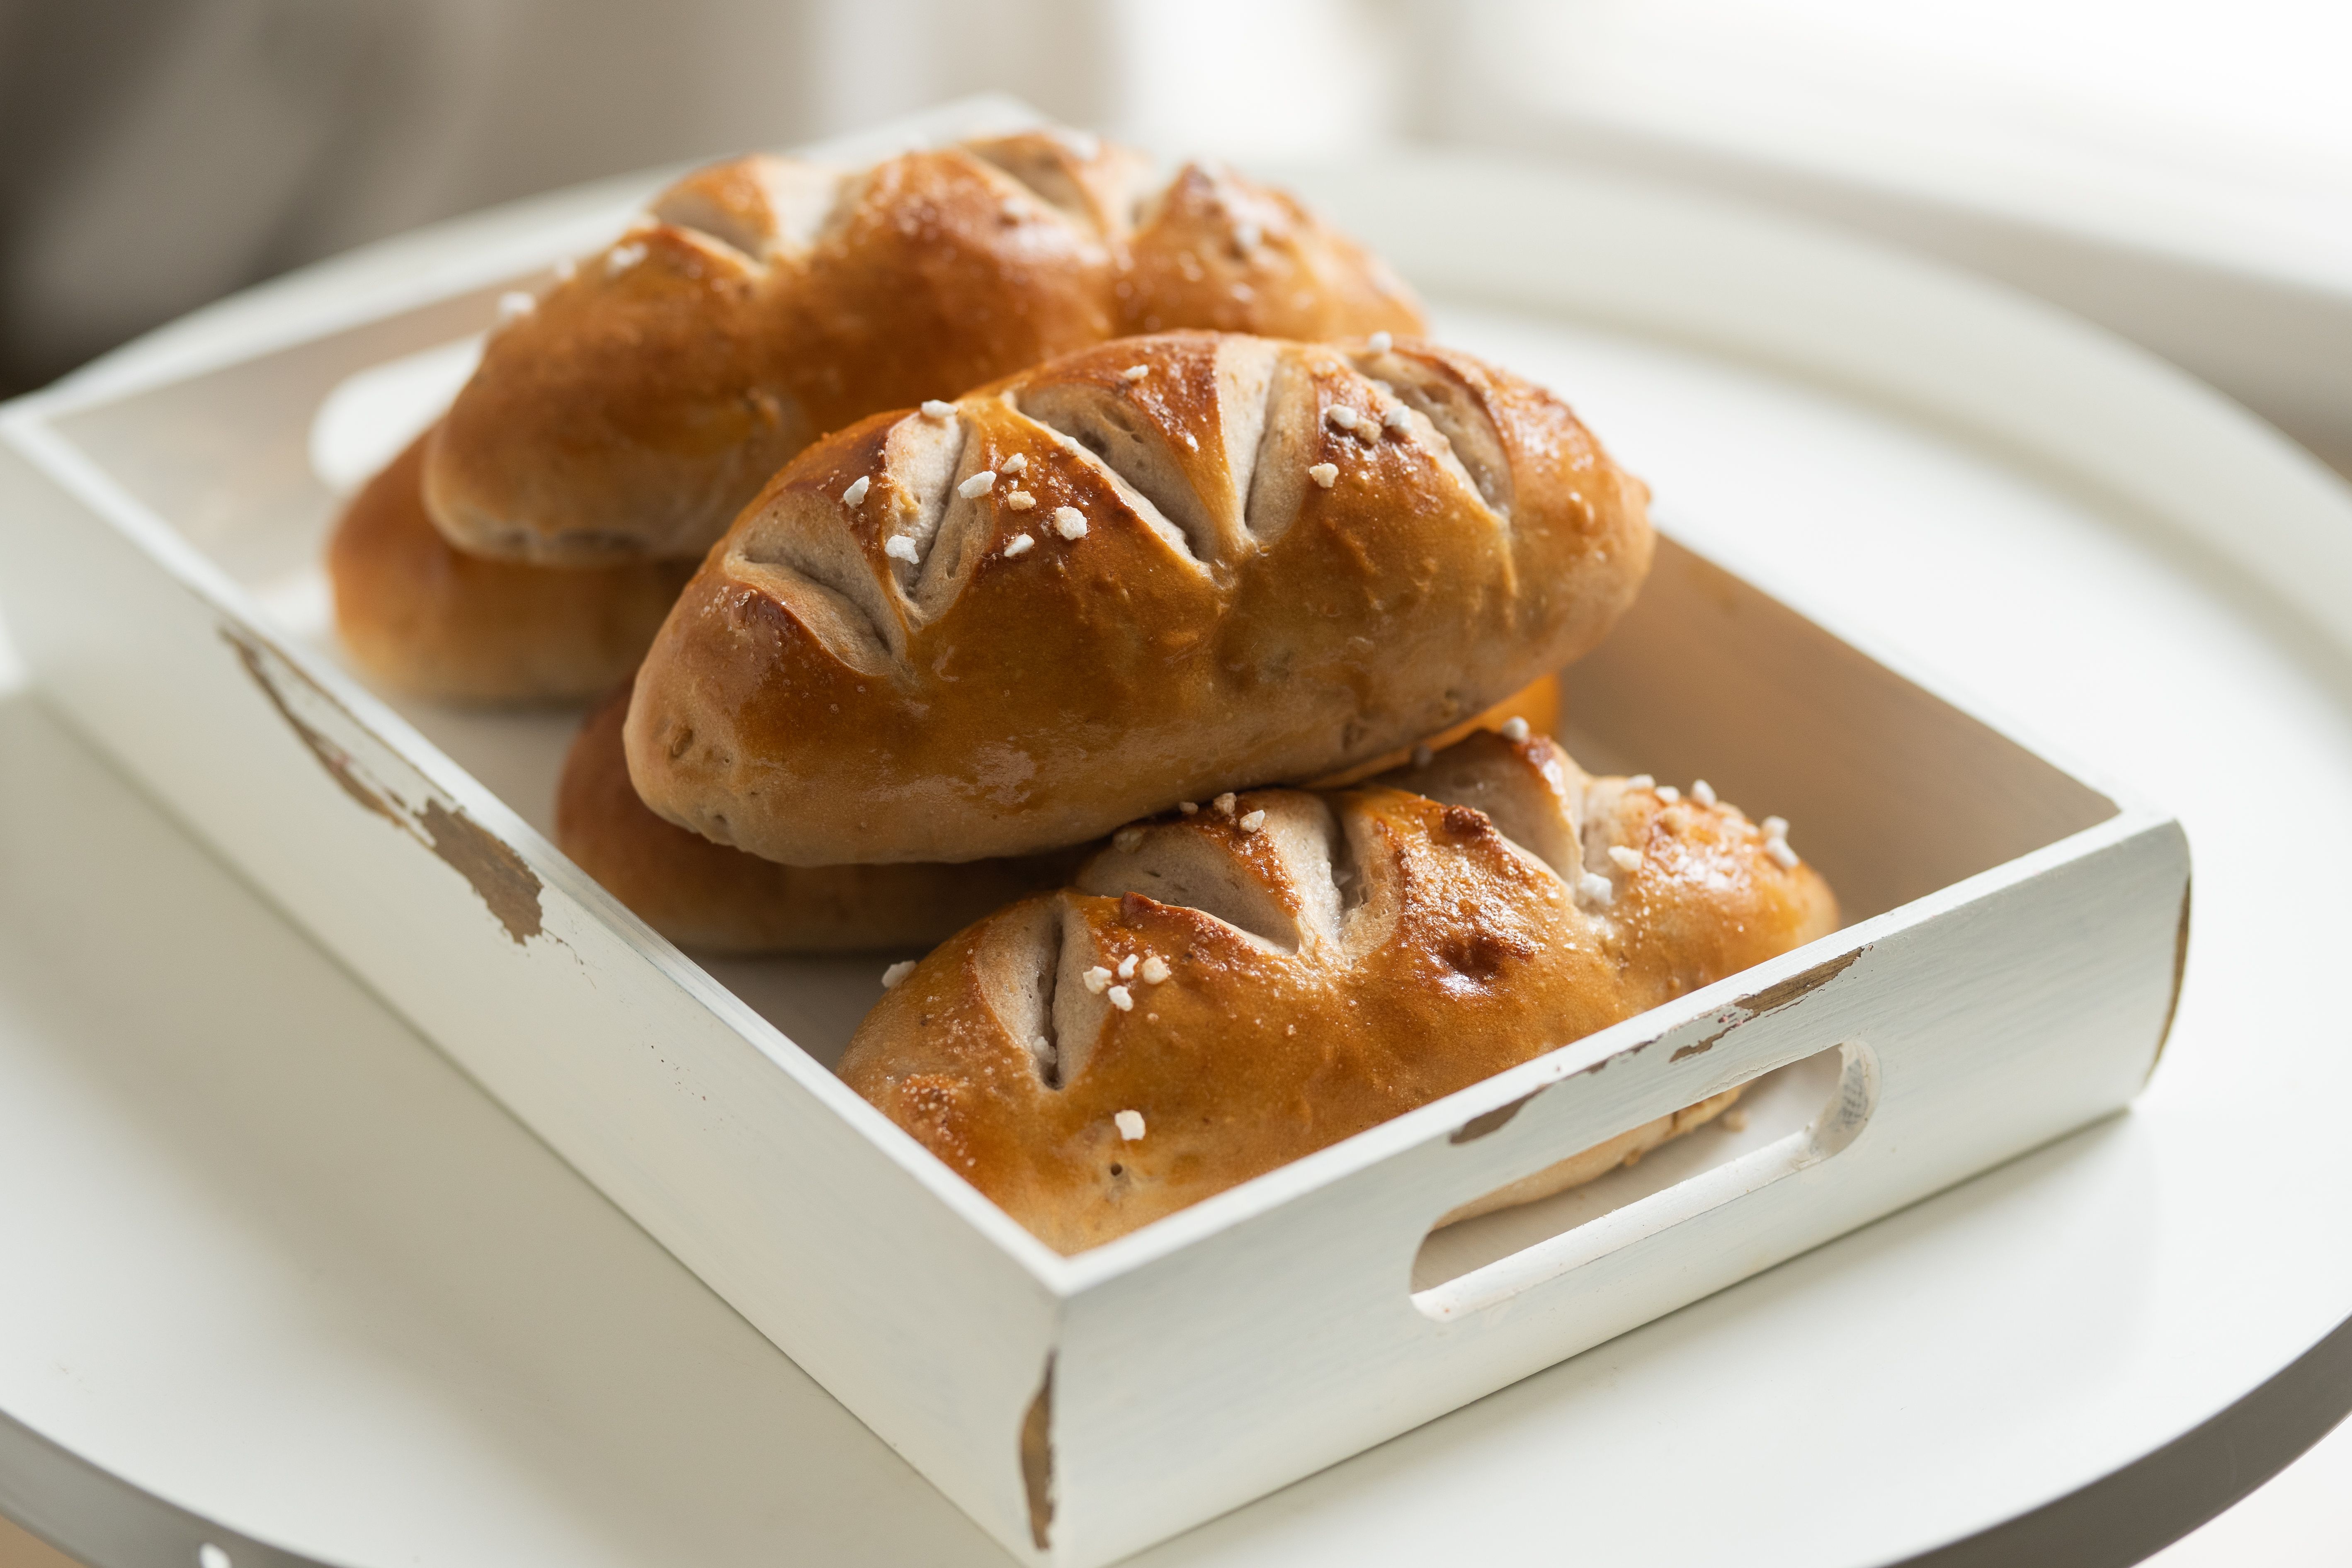
This Japanese salt bread recipe makes soft, airy shio pan rolls with salted butter centres, delicate golden crusts and irresistibly crisp buttery bottoms.
Calories
330g
Protein
8g
Carbs
43g
Fat
14g
Cut the salted butter into eight equal batons, each approximately 5–6 cm long and weighing about 14 g. Place them on a small plate and refrigerate until the rolls are ready to shape. The butter must remain firm and cold.
Place the bread flour and cake flour in the bowl of a stand mixer. Add the whole milk and water and mix on low speed until no dry flour remains. Cover the bowl and leave the rough dough to rest for 20 minutes.
Add the milk powder, sugar, instant yeast and fine sea salt. Mix with the dough hook on low speed for 2 minutes, then increase to medium-low and knead for approximately 5 minutes.
Add the softened unsalted butter in three additions, allowing each portion to disappear into the dough before adding more. Continue kneading for 6–9 minutes until the dough is smooth, elastic and slightly tacky rather than wet.
Stretch a small piece of dough gently between the fingers. It should form a thin, translucent membrane before tearing. If it tears immediately with rough edges, knead for another 2 minutes and test again.
Shape the dough into a ball and place it in a lightly greased bowl. Cover and leave it at approximately 24–26°C for 60–90 minutes, until it has increased to nearly twice its original size and looks airy.
Turn the dough onto a clean work surface and press it gently to release only the largest gas pockets. Divide it into eight equal portions weighing approximately 87 g each.
Shape each portion into a short teardrop or tapered cone. Cover the pieces with a clean towel and let them rest for 15 minutes. This resting period relaxes the gluten and makes the dough easier to roll.
Working with one piece at a time, flatten the dough and roll it into a long triangle approximately 35 cm long, with a base about 8–9 cm wide. Roll gently rather than forcing the dough. Rest it briefly if it repeatedly shrinks.
Place one cold butter baton across the wide end of the triangle. Fold the dough over the butter and pinch the sides lightly to enclose it. Roll towards the narrow tip with gentle tension, but do not stretch or roll so tightly that the dough cannot expand.
Place each roll seam-side down on a dark metal baking tray, leaving at least 5 cm between them. Cover loosely and proof for 45–60 minutes at a cool room temperature. They should look plump and airy, and a gentle fingertip indentation should return slowly.
During the final 25 minutes of proofing, preheat the oven to 220°C or 425°F. Position a rack in the middle. Avoid proofing the rolls beside the hot oven because the butter filling may soften and leak before baking.
Lightly mist or brush the proofed rolls with the measured water. Sprinkle each roll with a small amount of flaky sea salt. Do not apply a heavy layer because the dough and filling already contain salt.
Place the tray in the oven and immediately reduce the temperature to 205°C or 400°F. Bake for 14–18 minutes, rotating the tray once if necessary, until the tops are deeply golden and the bases are crisp and browned.
Brush the tops very lightly with the melted unsalted butter as soon as the rolls leave the oven. Transfer them to a wire rack after 2 minutes and cool for 8–10 minutes so steam can escape without softening the bases.
Serve the salt bread while slightly warm. The centre should be soft and airy, while the underside should have a crisp, buttery texture and a small hollow where the filling butter melted.
This salt bread recipe makes Japanese-style shio pan with a thin golden crust, a tender and lightly chewy interior, and a crisp buttery base. Each piece of dough is rolled around cold salted butter, which melts during baking and creates the characteristic hollow centre and fried underside.
The recipe makes eight bakery-sized rolls. Although the hands-on work takes approximately 35 minutes, the dough also needs time for hydration, fermentation, shaping and final proofing. Allow a little over three hours from beginning to serving.
Salt bread, known as shio pan in Japanese, is a crescent-shaped bakery roll made from lightly enriched yeast dough. A piece of butter is enclosed inside before shaping, and flaky salt is scattered over the surface before baking.
As the rolls enter a hot oven, the butter melts and produces steam inside the dough. Some of the butter remains within the crumb while some reaches the baking tray and crisps the base.
The result is not the same as a conventional dinner roll. Shio pan should have a lightly salted flavour, a soft but structured centre, a small butter pocket and a noticeably crisp underside.
The dough combines strong bread flour with a smaller amount of cake flour. The bread flour develops enough gluten to hold the shape and capture steam, while the cake flour prevents the crumb from becoming excessively tough.
Milk powder and whole milk add tenderness and mild dairy flavour without turning the dough into a heavily enriched milk bread. The modest amount of sugar supports fermentation and browning but does not make the rolls taste sweet.
An initial hydration rest allows the flour to absorb liquid before the salt, yeast and butter are fully incorporated. This makes the dough easier to knead and encourages a smooth, elastic gluten network.
Regular butter rolls generally contain butter distributed throughout the dough. They are normally soft on every side and do not have a large internal butter pocket.
Shio pan contains both butter in the dough and a separate cold butter baton rolled inside each piece. The melting filling is responsible for the hollow centre and crisp fried bottom.
The salt sprinkled over the top is also an important part of the flavour. It creates small bursts of salinity against the mild, buttery dough.
Bread flour contains enough protein to develop strong gluten. This structure allows the dough to stretch around the butter and expand rapidly in the oven without tearing.
Cake flour has less protein and softens the overall texture. Using only very strong bread flour can produce a roll that is chewier and tougher than the common semi-soft bakery style.
When cake flour is unavailable, replace it with all-purpose flour. The finished rolls may be slightly firmer but should still be successful.
Yeast dough rises more quickly when warm, but warmer is not always better for salt bread. The filling butter must remain solid during shaping and most of the final proof.
A finished dough temperature of approximately 24–26°C provides a useful balance. The yeast remains active, but the butter is less likely to soften prematurely.
Use cooler milk and water in a warm kitchen. In a cold kitchen, use liquid that is gently lukewarm rather than hot. Very hot liquid can damage the yeast.
Proper gluten development helps the rolls rise, retain their shape and form a light interior. The dough should become smooth and elastic and should stretch into a thin membrane without immediately tearing.
Add the softened butter only after the dough has started developing. Fat can coat flour particles and slow gluten formation when added too early.
If kneading by hand, expect the process to take longer than with a stand mixer. Use a stretch-and-fold motion and allow short rests whenever the dough feels difficult to handle.
The first rise develops flavour and creates gas throughout the dough. The second rise allows the shaped rolls to become light and puffy before entering the oven.
Under-proofed rolls may bake dense and can trap a pool of melted butter rather than absorbing part of it into the crumb. Severely over-proofed rolls may spread, deflate or lose oven spring.
Use the appearance and feel of the dough rather than relying only on a timer. Properly proofed rolls should look plump and should spring back slowly after a gentle press.
Begin by forming each divided portion into a tapered piece. After a short rest, roll it into a long triangle with a broad base and narrow tip.
Place the cold butter across the broad end. Fold the dough over it and secure the sides before rolling towards the tip.
Use gentle tension. Rolling too loosely can cause the pieces to unravel, while rolling too tightly prevents expansion and can trap all the butter in one large puddle.
Cut the filling butter into equal pieces and keep them refrigerated until needed. Work with one or two batons at a time when the kitchen is warm.
Enclose the broad sides of the butter before rolling, but do not crush the dough tightly around it. The goal is to contain most of the butter while allowing a small amount to reach the tray.
Place the completed rolls seam-side down. Their own weight helps prevent the tips from lifting during baking.
The crisp base is one of the defining features of salt bread. It develops when melted butter collects beneath the roll and fries the dough against the hot tray.
A dark metal baking tray absorbs heat efficiently and promotes deeper browning. Light-coloured or insulated trays generally produce paler, softer bases.
Parchment makes cleaning easier but creates a small barrier between the roll and metal. Bake directly on a clean non-stick metal tray for maximum crispness, or use parchment when sticking is a concern.
A light coating of water delays the setting of the outer surface during the first moments of baking. This allows the rolls to expand and helps form a thin crust rather than a thick, dry shell.
The surface should be damp rather than dripping. Excessive water can delay browning and soften the crust.
The rolls should be evenly puffed with deep golden tops and clearly browned bases. Pale rolls often lack the crisp exterior and full buttery aroma associated with shio pan.
Lift one roll carefully with a spatula and inspect the underside. It should be crisp and amber rather than soft and colourless.
Home ovens vary, so begin checking after 14 minutes. Extend the baking time by one or two minutes when the colour remains pale.
The dough should feel slightly tacky. Adding flour until it feels dry can produce heavy rolls with a tight crumb.
Flour with insufficient protein may not create enough structure to hold the butter pocket or support good oven spring.
Soft butter can smear into the dough or escape before baking. Keep the batons refrigerated until shaping.
Dough that has just been divided often shrinks when rolled. A short rest relaxes the gluten and makes long triangles easier to form.
A very warm proofing environment can melt the filling. Use moderate room temperature and allow more time when necessary.
Tightly compressed layers cannot expand properly and may trap liquid butter in the centre.
Under-proofed dough feels tight and produces a dense crumb. Wait until the shaped rolls look light, puffy and responsive to a gentle press.
Silicone mats and insulated trays reduce direct heat beneath the rolls and can prevent the signature crisp base.
Steam trapped beneath hot rolls softens the bottoms. Transfer them to a wire rack shortly after baking.
Mix softened butter with finely grated garlic and chopped parsley, shape it into cold batons and use it in place of the salted butter filling.
Place a narrow strip of low-moisture mozzarella or mature cheddar beside the butter before rolling. Avoid overfilling because melted cheese can force the seams open.
Blend a small amount of honey into softened salted butter, chill it until firm and cut it into batons. The honey can brown quickly, so watch the bases carefully.
Sprinkle black or white sesame seeds over the dampened rolls with the flaky salt.
Add a modest amount of firm sweet red bean paste beside the butter. Keep the filling narrow so the rolls remain easy to seal.
Replace the milk with unsweetened soy milk and use a firm plant-based butter suitable for baking. Results vary because plant butters have different water and fat contents.
Salt bread is rich enough to eat without an additional spread. Allow it to cool briefly before opening because melted butter inside can be extremely hot.
Yes. After kneading, place the dough in a covered container and refrigerate it for approximately 8–12 hours instead of completing the first rise at room temperature.
Divide and pre-shape the cold dough the following day. The final proof may take longer because the dough begins at refrigerator temperature.
Keep the dough tightly covered during refrigeration so the surface does not dry and form a skin.
Salt bread has its best texture on the day it is baked. Store completely cooled leftovers in an airtight container at room temperature for up to one day.
Avoid routine refrigeration because cold storage accelerates the firm, stale texture of bread. Freeze the rolls when they need to be kept longer.
Reheat a room-temperature roll in a 180°C or 350°F oven for approximately 3–5 minutes. This warms the centre and restores some crispness to the base.
A microwave softens the bread but does not restore the crisp underside. Use only a brief interval to prevent the bread from becoming tough.
Yes. Cool the baked rolls completely, wrap them individually and place them in an airtight freezer container. Freeze for up to two months for the best quality.
Thaw at room temperature, mist very lightly with water and reheat in the oven until the crust and base become crisp again.
The butter may have become warm, the seams may not have been secured or the shaped rolls may have been proofed at excessive heat. Some leakage is desirable because it creates the crisp base.
The dough may have been under-proofed, rolled too tightly or sealed completely around the butter. Proper expansion allows some butter to move into the crumb and towards the base.
The dough may need more kneading or proofing, or the flour may not contain enough protein. Check for good gluten development before the first rise.
The tips may not have been secured underneath, or the dough may have been rolled without enough gentle tension. Place every roll seam-side down.
Yes, although the texture may be softer and less chewy. Use an all-purpose flour with moderate protein and avoid making the dough dry.
Yes. Use the same weight, dissolve it in part of the recipe's lukewarm liquid and wait until it looks foamy before mixing the dough.
Yes. Use unsalted butter and add a slightly more generous but still controlled sprinkling of flaky salt over the tops.
The tray may be too light or insulated, the oven may not be fully heated or too little butter may have reached the base. A dark metal tray provides better direct heat.
It is best slightly warm rather than immediately from the oven. Resting for several minutes allows the crumb to set and reduces the risk of contact with extremely hot melted butter.
Enjoyed this free salt bread recipe? Explore the LaGrub app for premium bread collections, Asian bakery favourites, organised cooking inspiration and new subscriber recipes.
Log in to read and share comments, recipes tips, and connect with other food lovers.
Unlock the full recipe library, premium cookbooks, and members-only weekly drops. Cancel anytime.
Already a member? Sign in to unlock everything.
Explore more delicious recipes from our collection